Getting Started
Updated for v4.1.0Add Your First Item
Hang your first item on the tree in the welcome guide, or write a name in A New Sprout, choose a grove and tap Plant; learn which details to fill in the first time and which can wait.
Updated on Nov 15, 2026 ~17 min read
On this page
An item is one thing you want to remember: what it is called, where it is kept and how many you have. The first time, you only need a name and a grove to plant it. Photos, categories and dates can all be added later.
Practice with something you really do look for, such as your keys, a charger or your everyday scissors.
Add one in the welcome guide
After you plant your first grove, the guide asks you to Bring in your first thing:
- Write its name under “What is it called?”. You can also tap Take Photo or Photo Library to give it a photo first: the app cuts the thing out of the background, and if the name is still empty, it tries to write the name for you.
- Once there is a name or a photo, “Where does it live?” appears below with five seals: “Shelf”, “Drawer”, “Desk”, “Closet” and “Box”. Pick one, and that place is created in your grove with the item in it. You can also skip this, and the item goes straight into the grove.
- Tap Hang It on the Tree (or drag the item up onto the tree).
If you would rather not add one now, tap Maybe Later.
Writing the name for you uses AI recognition, which uses up one of this month’s tries (10 a month on the free plan). If you are offline, have no tries left, or the thing is not recognized, the name stays empty with a short note below it. Just write the name yourself.
Open A New Sprout
To add an item at other times:
- On Forest or Items, tap the green + at the right end of the bottom bar.
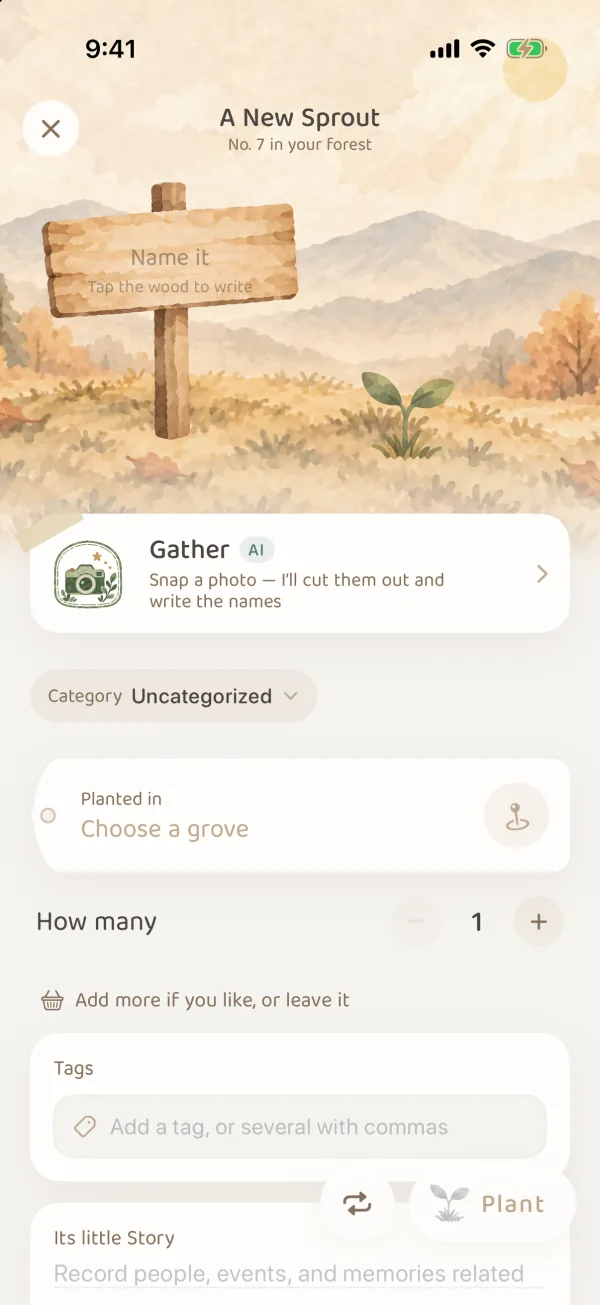
- The page that opens is A New Sprout, with “No. N in your forest” under the title.
If you tap + from inside a grove or a place, Planted in is already filled in with it.
Write a name
Tap the wooden sign at the top and write the name right on it. The name is the only required field.
Use the words you will search for later: “Black USB-C charger” is easier to find than “Charger”. If your forest already has something with the same name, the sign shows “Already in your forest: N with this name”, so you do not record the same thing twice.
To record several things at once, tap the Gather card under the sign and take a photo. The app cuts the things out one by one and names them. See Gather from a Photo. Once you start writing on the sign, the card shrinks to Gather instead in the corner.
Fill in just these
| Field | How to fill it in |
|---|---|
| Category | Uncategorized by default. When you choose a category, the Item Profile below gains the attributes that category records |
| Planted in | Tap Choose a grove and pick a grove; if it has places, pick the exact place too. Places you used recently come first. You can plant without choosing |
| How many | 1 by default. Change it only when one record stands for several identical things, such as a pack of 4 batteries |
Once you choose a grove, its seal is stamped on the wooden sign.
Write the count
You can write How many straight in, without tapping again and again:
- Tap the number and type it on the number pad.
- Drag the number sideways, and it slides up or down along a paper ruler.
- Hold − or + to count faster and faster, then by tens.
It goes up to 9,999. The nursery changes with it: from 4, a small wooden marker with the number stands at the edge of the bed; from 10, a whole row of seedlings.
You write the count this way when you add an item, split it into batches, edit an item, fill in gathered labels and bring something back from your memories.
If you want to write more
Everything under “Add more if you like, or leave it” is optional, and you can skip it all the first time:
- Tags: words you will later use to find things, such as a purpose or an occasion.
- Its Little Story: the people, events and memories that go with this thing.
- Item Profile: usage status, purchase date and expiry date, plus category attributes such as brand, price and warranty. Which rows appear depends on the category; see “Add an expiry date” below.
- Treasure Box: receipts, manuals, warranty cards or close-up photos.
- Connected Items: things that go with it, such as accessories, chargers and cases. See Item & Basket Connections.
Add an expiry date
For things that expire, such as food and medicine, tap the Expiry Date row in Item Profile and pick a date. The app then asks “Have the sparrow tell you when it’s due?”. Tap OK, and you get an Expiry Letter when it is close to expiring. See Leaf Gathering and Expiry Letters.
If there is no Expiry Date row in Item Profile:
- First tap Show all N attributes under the card. The row may just be folded away.
- If it is still not there, this category does not record expiry dates. Uncategorized does not by default. Switch to a category for things that expire (such as Food), or tap Attributes at the bottom right of Item Profile in A New Sprout, turn on the built-in Expiry Date attribute in the Edit Category page that opens, and tap Save.
You can also change this later in More › Categories & Tags. See Categories & Custom Attributes.
Plant it
- Check the name and Planted in once more.
- Tap Plant at the bottom right.
- Go back to Forest or Items and check that it is there.
The round button to the left of Plant is Continuous Planting Mode. When it is on, A New Sprout stays open after you plant one item, ready for the next. Use it when you are recording lots of things at once.
If you close the page before planting, you see “This one isn’t planted yet”: if you leave now, what you wrote on the sign and any photos are not kept. Tap Keep writing to go back to the page.
After you plant it
- Open the item and check its grove, place and quantity on the item page. See Item Pages.
- Search for part of its name in Items to make sure you can find it.
- When you move it in real life, remember to change its place on the item page.
Common questions
Do I have to create groves and places first?
No. In A New Sprout you can plant with just a name. (With Gather, both the name and the category are needed.) An item with no grove is planted in the Nursery for now and shows as “Unassigned” in Items. Add its grove on the item page later.
Should things with the same name be one record?
For identical everyday things where you only want the total, make one record and change the quantity. If they are kept in different spots or are in different conditions, split one record into lots. See Manage by Lots.
The page did not close after I planted?
Continuous Planting Mode is on. The page stays on A New Sprout waiting for the next item. Go back to Forest or Items to check that the one you just planted is there, and do not tap Plant again.
How many items does the free plan hold?
30 items in stock in total, counted by quantity: one record with a quantity of 4 counts as 4. See Forest Guardian Plans.